CarboXtrem TT Aerobars
€890,00
CARBOXTREM
Pre-launches, custom-fit tips and offers for your bike. No spam: only what is worth it.
Already have an account? Sign in28/07/2026 · Alfonso Lopez Pe

Of all the bolts on a bicycle, the seatpost bolt has the biggest influence on how you feel on the bike. A few millimetres up or down change your knees' range of motion, the stability of your pelvis on the saddle and even the force you can apply to the pedal. And yet it is common to find bikes being ridden for years at the height they came with from the shop, or the height they were left at after a puncture and a rush.
The good news: fixing it costs nothing. Just an Allen key, a tape measure and a little patience. This guide explains how to find your height, which signs show you have it wrong and the point at which the problem stops being position and becomes something else.
Pedalling is a cyclical movement with two extremes: bottom dead centre, with the leg almost extended, and top dead centre, with the knee at maximum flexion. Saddle height decides how far that leg stretches at the bottom and how much the joint closes at the top.
Bike fit professionals work with a knee flexion range at bottom dead centre that, measured on video, usually sits around 25-35 degrees. You don't need to measure angles with a goniometer: it is enough to understand that we are looking for a leg that is almost extended, never locked, and a hip that doesn't have to reach for the pedal.

No formula gets it right first time for everyone: there are differences in femur length, flexibility and footwear. What these methods do is get you very close so you can fine-tune by riding.
The quickest one, and one you can do on your own at home:
When you return to the correct position —with the ball of your foot over the pedal axle— that slight flex we were looking for will appear automatically.
The classic method from the eighties, popularised by Greg LeMond, is still a useful reference: measure your inseam barefoot, standing against a wall with a book pressed up firmly, and multiply that measurement in centimetres by 0.883. The result is the distance from the centre of the bottom bracket axle to the top of the saddle, measured along the seat tube.
Treat it as a rough starting point, not a verdict: it changes with sole thickness, cleat type and bike geometry.
If you race, ride a lot of hours or have discomfort that won't go away, a video-based biomechanical assessment measures what the eye can't see and evaluates height together with all the other variables. It is the option with the smallest margin of error, and the only one that can detect real asymmetries or leg length differences.
| What you feel | Likely cause | What to try |
|---|---|---|
| Your hips rock as you pedal | Saddle too high | Lower it 3 mm and check again |
| Pain behind the knee | Saddle too high or too far back | Lower 2-3 mm; check setback |
| Pain at the front of the knee | Saddle too low or too far forward | Raise 2-3 mm; check setback |
| Quads always heavily loaded | Saddle too low | Raise in small steps |
| You slide towards the nose | Nose tilted down | Level the saddle and reassess |
| Numbness in the perineal area | Nose too high, wrong width or too much padding | Level it; check width and density |
| Localised pain in the sit bones | Insufficient support surface | Check saddle width and structure |
There are three more variables you shouldn't confuse with height, because they cause similar discomfort:
This is how far forward or back the saddle sits on its rails. It affects the position of your knee over the pedal and, along the way, how much weight rests on your hands. Many problems blamed on height are solved here.
The sensible reference is to start level and correct in fractions of a degree. With the nose too low you slide forward and end up holding yourself in place with your arms and abs for the whole ride; with the nose too high, pressure on the soft tissue increases.
A saddle that is too narrow for your pelvis rests on soft tissue instead of bone; one that is too wide rubs as you pedal. The measurement that matters is the distance between your sit bones, and you can take it at home with a piece of cardboard: we explain it step by step in how to measure your sit bones to choose the right saddle width.
This is where a lot of people get stuck: the height is right, the saddle is level, the setback is correct… and the same discomfort keeps appearing, always in the same place, always from the same hour of the ride.
When that happens, stop turning bolts. The problem is no longer where your body is, but what it is resting on. And two factors come into play:
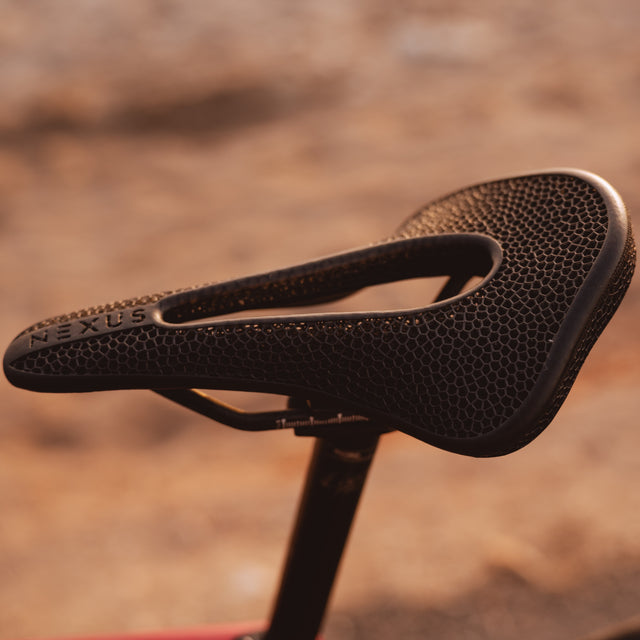
The NEXUS 3D Carbon Saddle tackles exactly those two variables. Instead of uniform foam, its body is a cellular structure —a lattice— made with Carbon's DLS technology in EPU 41 elastomeric resin, on a laminated carbon fibre base.
That architecture allows something homogeneous padding can't offer: tuning density zone by zone. Firm where the sit bones rest, more flexible in the transition areas, open so air circulates and sweat doesn't build up. That is why, when you order it, you choose two of your own figures —your average weight and your sit bone distance— instead of an S/M/L size.

| Feature | Detail |
|---|---|
| Dimensions | 240 × 140 mm |
| Weight | 146 g |
| Core | 3D lattice in EPU 41 resin (Carbon DLS technology) |
| Base | Laminated carbon fibre |
| Customisation | Rider's average weight and sit bone distance (70 to 160 mm) |
| Resistance | Water, sweat, UV rays and prolonged wear |
| Maintenance | Easy cleaning and long durability |
Hip rocking is the most reliable sign: if your pelvis moves from side to side as you pedal, you are stretching further than you can reach. It usually comes with pain behind the knee and a feeling of being on tiptoe at the bottom of the stroke.
2 to 3 mm per adjustment, and do several rides before judging. A whole centimetre at once is an abrupt change for a joint that repeats the same movement thousands of times.
As a starting point, yes. After that you need to fine-tune by riding: sole thickness, cleats and frame geometry all shift that number.
The biomechanical reference is similar, but on the mountain bike it is usually lowered slightly for more control on technical terrain. The dropper post exists precisely so you don't have to choose.
Check tilt and setback. If the discomfort still keeps returning to the same spot, look at the saddle's width and density: the problem is in the support surface, not the position.
From the centre of the bottom bracket axle to the top of the saddle, following the line of the seat tube. It is the only measurement that can be compared between bikes.
Saddle height is the adjustment with the best effort-to-result ratio on the whole bike: it takes five minutes and changes how you feel for hours. Find your reference with the heel method, move in steps of two or three millimetres and give your body time to have its say.
And when the position is sorted and the discomfort keeps appearing in the same spot, change the question: stop looking at where the saddle is and start looking at how it spreads your weight.
Sound familiar? Discover the NEXUS 3D Carbon Saddle: a 3D-printed lattice with density calculated for your weight and sit bone distance, a carbon base and 146 g.
Topics